So the question recently came up regarding how to add a logo to one’s photo. There are many ways that this can be…but I will do the step by step for creating a brush to apply your watermark or logo. This can be done in PSE or PS! I am using PSE9.
1. To begin, start with a blank document. I usually size mine 1000 pixels by 500 pixels. If you want something that is more squared, go with 1000 x 1000.
2. Next, create the text you would like to have in your watermark. I am in business under Amanda Atchison Photography, so that is what I use. I have used 2 text layers in creating mine, as I wanted photography in a different font. And there are many great fonts available for personal/commercial use. One site I go to often is www.kevinandamanda.com. Just read the rules for use before downloading.
3. This step is optional. If you wish to have only text, proceed to the next step. But if you would like to add a graphic to your design, you can do so now. Begin by finding or creating a graphic that you like. Please remember, if you have aspirations of ever using this as a business logo, make sure that the creator allows for commercial use! The graphic I am using has been purchased for commercial use.
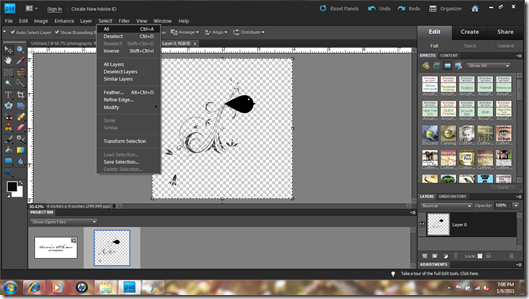
Begin by opening your graphic. I then go to select: all
Once you have selected all, go to edit: copy merged
Now return to the document you are creating and choose edit: paste
If needed, resize your graphic. To resize and maintain proportions, hold down the alt key.
4. Now, you need to flatten your image. This is done by going to layer: flatten
5. Now that you have one single layer, you are now ready to create your brush. To do so, go to edit: define brush
Once you have clicked that, a box will appear asking you for a file name
Name your image and select OK.
6. Are you ready to try out that new brush on an image? I thought so! So…open up an image and prepare it as you normally would to post on your blog. Once any editing has been made, you will once again want to flatten your image (layer: flatten). Now create a new layer by pressing shift+ctrl+n. This will be the layer you add your watermark too. By adding putting it on a separate layer, you can adjust the opacity to your liking.
Now go to you tools and select the paintbrush. Click the drop-down menu and scroll down to until you see the file you saved just a few minutes ago and select it.
You are now ready to add it to your photo! Adjust the brush to the size you wish and color you wish. Then add it!
Once you have added it, you can adjust the opacity until you have it where you want it.
And there you go…you can create your own watermark just that easy!!! And as I said in the beginning, this is just one of several different ways you can do this. I hope that is helps!!!


Very nice of you to explain this. I was very happy when I figured out how to do this a few weeks back. I think many people will like having the option of a watermark for their work.
ReplyDeleteso so awesome! I am doing this right now, but I am looking for a cool graphic. That part is NOT easy! (for me)
ReplyDeleteThank you SO much!!
I did it! I did it! At least I made one, not sure if it's going to be the one to last, but I like it so far!
ReplyDeleteYou can see on a couple of the photos on http://karaleighphotos.blogspot.com
Not sure if I made them too big or too small, or if I should always put it in the same place of not..
Thank you for all your help!
Couple of questions. Doesn't the watermark need the copyright symbol on it? And does it legally need your full name? Or can I use my first tw initials?
ReplyDeleteCool tutorial - thanks for explaining it.
ReplyDelete